Showing posts with label review. Show all posts

Tuesday, June 7

Self Tanning Routine ft. Toma's Liquid Spray Tan Review!


Summer's coming up which means my tanning routine is more frequent now than the rest of the year and is definitely something I enjoy pampering myself with. I haven't noticed Toma's Tan getting much attention from any YouTubers I watch or bloggers I follow but it's my favorite tanner so I figured I'd write a bit about my tanning routine!

I buy my tanner, Toma's Liquid Spray Tan, from Sally Beauty Supply for about $17. I have yellow under toned skin that gets warm when I naturally tan in the sun so some self tanners can make me look orange. This tanner is slightly pink-based when it goes on, cancelling the chance of it looking too fake (it is a fake tan, after all) so it works really well with my skin tone. I previously used the Toma's Tan Perfect Self-Tanning Lotion which, as the name states, is a lotion rather than a liquid spray. It's good as well, however I like that the liquid one isn't as warm toned and it's easy to apply with the mitt it comes with.

| Supplies |

  • Tanning mitt
  • rubber gloves
  • coconut oil and sugar (or any scrub)
  • kabuki brush
  • thick lotion
  • moisturizer
  • Toma's Tan Liquid Spray Tan

| The Process |
I start off the day before (or morning of) by mixing up an exfoliant with coconut oil and sugar until it holds together well but isn't dry. Using gloves I exfoliate my legs thoroughly, my arms, and my upper chest as well. Basically I apply it to areas that can get dry skin or that tanner comes off quickly from.
Once I have applied my scrub, I lather it with body wash on my legs and shave them carefully. Since shaving after self tanner tends to take some of it off, I always shave before applying tanner to make sure it lasts.
When it comes to applying this tanner,, I always apply it at night. I wear rubber gloves and spray several times on the mitt and immediately work it in since it does kind of dry and can take of the indicator if I apply fresh tanner over dried tanner. I like to apply it starting with my upper back, then my upper chest and the underside of my arms (since my outer arms are darker during the summer), avoiding my elbows and hands entirely then move on to my lower back and stomach. I apply it to my legs last, avoiding my knees like I did to my elbows.
Lastly I grab a kabuki brush and apply tanner to my neck and the left over product on my ears. I mix a bit of facial moisturizer and a spray or two of tanner and buff it into my face thoroughly. For my hands, I remove my gloves and blend in a tiny bit of tanner upwards on the inside of my wrists so there's not a harsh line. For my knees, I use a mixture of about 80% lotion and 20% Toma's Tan since my knees are naturally a bit darker than the rest of my legs. I blend my ankles into my legs the same way I did my hands but with a bit of lotion.

Although this tanner does have an indicator (which does make it really easy to see exactly where it's been applied), it doesn't come off on my clothes or sheets so I always wear loose clothing and let it soak in over night. In the morning I wash off the indicator using some body wash and bypassing the loofah entirely so I don't disrupt my new tan.

That's my whole process! It doesn't take too long and my tan always looks really even. It usually lasts for a week or so, depending on if I swim, work out (extra showering) or shave. I also like to apply lotion daily to keep my skin from getting dry so it holds my tan better. For upkeep I apply tanner again without exfoliating every time, especially if my tan is wearing off evenly.

What's your go-to tanner?
Thanks for reading! xo
Hannah

Follow my blog with Bloglovin!

Friday, August 7

Zoya Naked Manicure Women's Starter Kit Review ♡


Zoya released a new line of polishes at the beginning of this month called Naked Manicure. Being someone who struggles with flaky, weak, thin nails, I was immediately intrigued and decided to purchase it. I originally set out to pick up the Women's Starter Kit in store at Ulta, however Ulta doesn't supply the kits and instead sells the polishes individually which is, unfortunately, much pricier. I ordered the kit through Zoya's website (linked earlier) and received it quickly. It comes with the Naked Base ($12), the Pink Perfector ($10), the Tip Perfector ($10), and the Satin Seal Top Coat ($12), a $44 value, for $25 total. My package also came with a pamphlet full of information about the polishes, before and after pictures, descriptions of the ranges, and color combination charts for canceling out tainted nail colors.


I wish my nails were strong and healthy (like my dad's!) but since they're not I have to do what I can to keep them presentable. I mainly struggle with flaking, however I am growing out some stubborn staining from a polish I used a while back. I did use a baking soda and lemon juice soak on my nails to lighten it and it definitely helped remove some slightly orange discoloration from the tips.


The first step is to apply Naked Base, a thin, clear, base coat that helps prep for the polishes and begins to mask the look of layers of nail on the tips of my nails. Pink Perfector is next which is a translucent rosy pink that helps correct discoloration and camouflages flakes. The Tip Perfector is a relatively opaque creamy white polish that is applied to tips to brighten and accent them. I read a lot of people's comments on Zoya's Facebook about how it's too opaque for nails to look natural, however I like to apply a second coat of Pink Perfector after using it to blur the tips before applying the Satin Seal Top Coat. Unfortunately I don't have a picture of the top coat, but it's a gorgeous mostly matte finish which also blurs imperfections and really gives a natural appearance.

The wear, unfortunately, is not as long as I would like. With my nails I would say I can get maybe four days. I want to try it out with a bonding base coat and see if that increases its wear time! My friend wore it for over a week on her strong, long nails and it looked amazing the whole time.

Overall, I really like these products and I'm going to repurchase them when I run out!
Have any of you tried any other colors of perfector or Naked Manicure in general? What do you think?
Thanks for reading! xo

Thursday, June 18

Maybelline Dream Bouncy Blush First Impression


I recently had a coupon for buy one get one half off Maybelline products. I figured it was the perfect time to use it since I had just been obsessing over trying a red cream blush and decided to pick out the Maybelline Dream Bouncy Blush in "Hot Tamale."

In regards to packaging, I do like the flip top lid with the raised, rounded product. The blush does feel "bouncy" in a sense; when I push on it a small indent forms that goes back to normal over time. I don't love the texture, however; it's somewhat frustrating since I like to use my fingers to apply cream blushes like this when I don't use my Beauty Blender and it ruins the appearance. The airy, "bouncy" feeling also makes the blush seem delicate and easy to ruin. The wear isn't as long as I would expect from a cream blush, however it does last for hours. It's very pigmented so a little goes a long way. The blush isn't as red swatched, though, in comparison to the color in the packaging.

What other Dream Bouncy colors are good? Does the texture freak out anyone else?!
Thanks for reading! xo
Hannah


Saturday, January 24

♡ Kitchen Beauty Care ♡ DIY Makeup Remover

This is one of the easiest DIY skincare regimens I use and it's because all it calls for is coconut oil! I have very straight eyelashes so I only ever use waterproof mascara which is very hard to remove. I've tried store bought makeup removers but they're all chemicals and usually burned when I used them since my skin and eyes are so sensitive.

The coconut oil I use is from Costco and it's ginormous. It's my oil of preference, though, since it's cold pressed and extra virgin. Both of those are extremely important since it's used on the face but especially on eyes.


  1. Pick up a pea sized blob of coconut oil on a washcloth or your fingers.
  2. Massage onto a closed eye for 1-2 minutes or until the mascara feels broken down.
  3. Wipe away gently with a washcloth from the top and bottom of the eyelashes to remove all of the oil.
  4. Rinse off with water if residue remains on eyelids or under eyes.

That's all it takes! For the demo I used my Maybelline the Rocket Volum' Express mascara in waterproof (here's my review)! Using the coconut oil does pull some of the curl out of my lashes like the "after" picture shows. It's actually really good for them, however! It makes them softer and can help stimulate growth and thickness over time. This can also be used to remove face makeup as well as long as you rinse off the used oil or as a hair mask!
Here's my last Kitchen Skincare post: DIY Lemonade Scrub!
Have you tried using coconut oil as a makeup remover? What else do you like it for?
Thank you for reading! xo
 

Saturday, December 27

Cold Weather Care ♡ Winter Products


It's officially winter now, one of my favorite seasons, and the cold weather tends to take a beating on all skin and especially hair. These are my favorite products to keep them in shape!

| Philosophy Peppermint Bark Shower Gel | $8.50
This is technically also a bubble bath and shampoo, but I mainly use it for washin' my bod. Not only does this stuff smell exactly like peppermint bark, one of my favorite treats, but it also has a recipe for bark right on the bottle! Granted, I haven't tried it, but if it tastes as good as this smells it's worth it. This isn't necessarily a must-have for moisturization, but I love using wintery smelling products to keep up festivity.

| Yes to Cucumbers Daily Calming Moisturizer | $14.99
This is my go-to year round, but I use it religiously during colder months. It reduces redness, which is amazing for paler skin when the sun isn't blessing us, and it's hydrating enough to keep my skin from getting dry patches. When I do get them I love using my DIY Lemonade Scrub. Bye, bye, dry! (too cheesy?)

| J.R. Watkins Hand and Cuticle Salve in Aloe and Green Tea | $8.99
I love applying this well to my hands and cuticles at night to moisturize and heal them from the sharp air that day and prep for the next day. This stuff takes a while to absorb so give it some time! A little also goes a long a way, which is nice since hands need a little extra TLC right now. I've been using it since before April, when I posted my Nail Care Routine!

| Julep MIGHTY Nail and Cuticle Serum | $12.99
I was never much into specifically caring for my cuticles until I unboxed this guy from my Julep back in August. This is a metal tube with a twist that dispenses product into a brush, making application easy peasy. This doesn't have much of a smell which is nice, and I can see a noticeable difference in my cuticles almost immediately.

| One 'n Only Brazilian Tech Treatment with Pequi Oil | $7.89
I got this for free when I bought a One 'n Only shampoo and conditioner set and I'm so glad I did since I never would've tried it. I apply this to my wet or dry hair and it instantly looks smoother, shinier, and feels softer. Hair can get so dry; it's important to hydrate it! Do you guys want to see a current hair care routine? I have a pretty nice regimen right now.

| Bath and Body Works Twisted Peppermint Nourishing Hand Cream | $5.00
I bought this for my mom a week or two ago and both of us are really impressed! She has very dry hands and I have normal hands that don't get too dehydrated but it works wonders for both of us, in addition to smelling great. It's very hydrating but also soaks in really quickly and smells wonderfully festive. I was excited that it was only $5 since it feels so rich!

| Nuxe Reve de Miel Lip Balm | $19.00
This. stuff. is. amazing. It's very think, smells like honey and citrus, and is slightly gritty. I know that sounds weird, but it really helps banish dry lips in hours. I love applying it at night and waking up with soft, smooth lips. I bought this in the anniversary packaging for my mom for Christmas and I think it's so eye-catching. Pick one up now if you want to since they're limited edition! The limited colors are red, yellow, and green.

Those are everything I keep handy for cold weather! I especially recommend the Reve de Miel lip balm if you buy any of this. It's magic! I may do a review it and include some shots of the anniversary one of my mom's. What do you use in the winter?
Thanks for reading! xo

Monday, June 16

St. Ives Apricot Scrub: Dry Patch Fix!


I would probably describe my skin as normal, sensitive, and semi acne-prone. However, sometimes my skin goes through weird cycles where it gets dry patches on my cheeks or it gets a little oily. Since I'm not use to being dry, I had to test out different ways to get rid of my really stubborn dry patches. This St. Ives Blemish Control Apricot Scrub helps with blemishes, minimizing pores, and it also buffs away any weird areas. Yay! We have a winner.

| USE |
The first thing I do is gently cleanse my face and remove as much of my makeup as I can. Next, I apply a large dollop of the face scrub and run it under some warm water. Starting with my problem area (usually my cheeks) I rub it onto them in circular motions. Once I've covered the whole area, I massage the rest of the scrub on my fingers to the rest of my face, again in circular motions. At the end I go back to my cheeks and make sure I really buffed out any dry areas. To wash it off, I wet a towel with warm water and gently wipe horizontally to get rid of everything (especially the lingering exfoliating beads). Then I pat my face dry and apply my Yes To Cucumbers Soothing Daily Moisturizer. The after picture is when I also have makeup on, so you can clearly see that almost, if not all, of the weird dry patches are gone! Woohoo! In the after picture I also have a BB cream and powder on, and it's still smooth! Does anyone else have skin that does weird things like this or is it just me..? Thanks for reading, guys! xo

Saturday, April 12

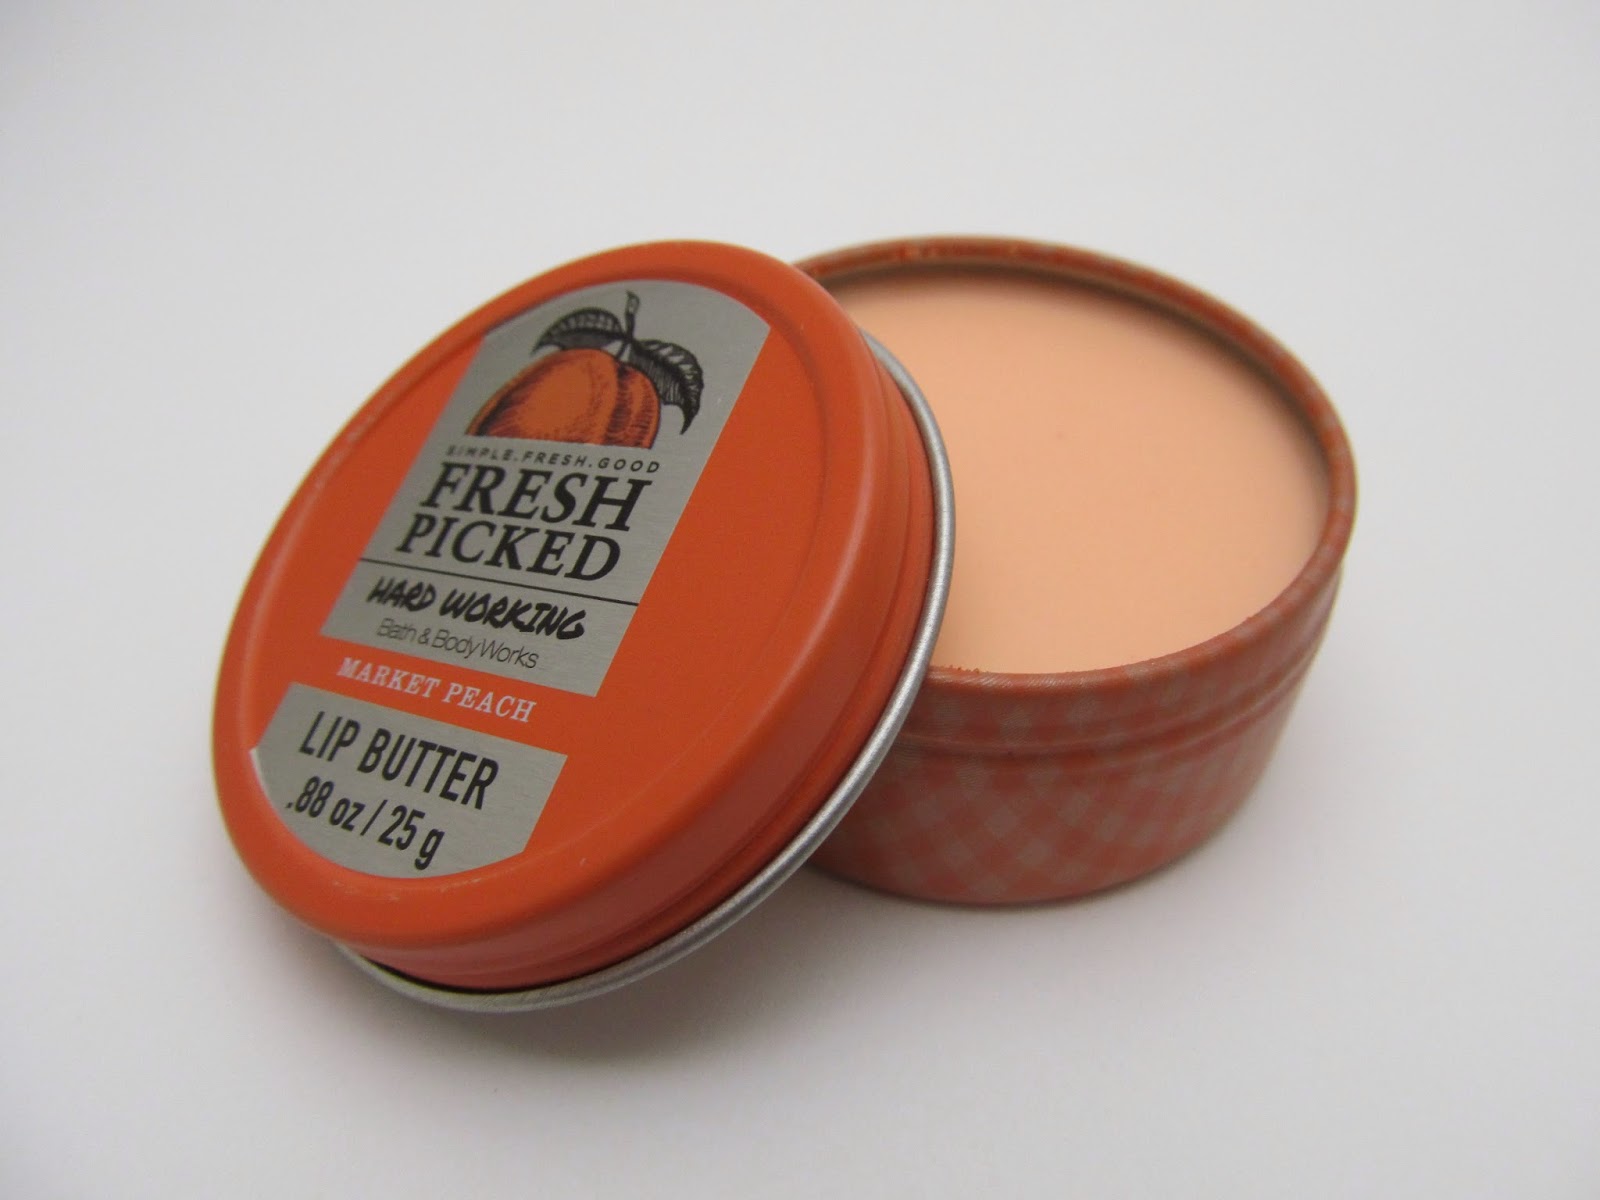
Market Peach Lip Butter First Impression


Let me first apologize for the unsightly scratches on the lid. This little baby floated around in the zipper pocket of my purse for a week before I had the time to take pictures of it. I wanted to photograph it before I used it since it looked so dang pretty and matte. 
I just used it for the first time and boy let me tell you, it smells sooooo good. I already knew that though, since that's mostly why I bought it in the first place. I was actually watching one of Amarixe's videos (in particular her Bath and Body Works Haul), and she mentioned that they had released the Market Peach scent in a variety of other forms other than candle (insert an excited jig here). I love the market peach scent in general, and I'm so glad it's not just a candle this year. I also bought the hand sanitizer and it's marvelous as well. Anywho, I bought this puppy for $8.00, which I originally thought was a bit surprising. It is quite a bit of product however, and I've seen similar lip products for more. It melts into a shiny cream that has no color on the lips, but it does leave shininess in on the top of the butter in the package as well. Once it's on the lips for a bit, the scent seems to kind of wear away. I don't notice the scent as much unless I make a (super cute) face and push my mouth towards my nose. Little known fact, I can also lick my nose (don't be too impressed, now). I do really like this. The packaging is nice and metal, and the lid twists on which is awesome since there's less of a chance of it opening in my purse. I think I can finally put away my Reve De Miel and save it for emergency lip chappings since this butter is pretty hydrating. My lips have had kind of a verging-on-chapped time for the past two months, and I've been keeping my most nourishing balm handy. Hopefully this little guy can help keep my dryness at bay. I'm not kidding when I say that I have lip balm of some kind on all day every day. I don't like the feeling of even slightly dry lips. Rambling aside, I'm impressed with this so far. I'll come back with a review later, once I feel I've fully tested it out.
Thanks for reading! xo

Sunday, March 23

Essie Good to Go Nail Polish Top Coat Review


About six months ago or so (maybe longer, who knows?), I was using the end of my Seche Vite top coat and the bastard had turned yellow-ish and made my nail polish color look off. I think it's maybe because I'd had it for a while and thinned it down several times. That put me back on the hunt for a new holy grail top coat. (I have since returned to Seche Vite and I'm so glad I did. It works so dang well and I haven't had any more issues with it)
I remembered that I'd seen a pin for a "gel manicure hack" using the Sally Hansen No Chip Acrylic Top Coat. I did not have a good experience with that nail polish whatsoever (possible review on that later). After returning it, I decided to do more research and Googled something like "best drugstore top coats." I came across the Makeup Alley review page for the Essie Good to Go and it had 4.2/5 and tons of glowing reviews, so I decided to buy it.

| PRICE |

As usual for where I live, this Essie polish was $8. I have no problem with paying that since I'm a huge Essie fan; I literally have over 20 of their nail polishes (no judgement, please. ;)

| PACKAGING |


The packaging is different from the nail lacquers (I prefer those), but I think it's normal for the products other than the colored polishes. The brush size is normal for Essie, and it works quite well to apply the product. I really like that it comes in its own little plastic box. Excuse the price tags, random products, and messy background in the picture. I threw out my old bottle once I finished it so I had to "sneakily" take pictures of it in my local Fred Meyer. They have security cameras on the beauty isles, so I hope someone got a laugh out of me trying to be nonchalant.

| PRODUCT |

Nail polish in general chips pretty fast on me since I have weak, square/squoval nails. With this top coat, it lasts for maybe three days while with others its lasted for up to a week. The bottle claims "rapid dry + shine," and I agree with both. It really does dry fast, and it definitely makes them shiny.

| OVERALL |

This isn't my favorite topcoat, but it's still pretty good. I really like how fast it dries and I also like how easy it is to paint on. I think that since it's a fast drying top coat the chipping protection isn't as impressive as it could be. I'm relatively neutral about this product.
Thanks for reading! xo